Those essential extras
This month we will look at those essential extras, both field and workshop that are required to build and run a helicopter.
Field Essentials
First, let’s look at the field ancillaries. These are the bits that are required for starting the helicopter, and are often overlooked when purchasing that first helicopter.
The basics are as follows:-
- a box for all the bits.
- starter motor
- starter wand (hex starter shaft)
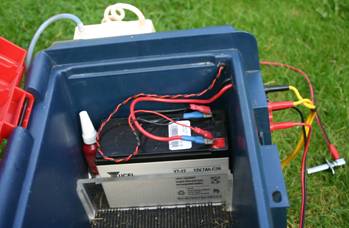
- 12 Volt battery power source
- field chargers
- tools
The Flight Box
The flight box must be capable of not just holding all the equipment; it must be waterproof for that short shower, after all, our weather is not very predictable. It must also be lightweight and not awkward to carry from the car to the field. There are many flight boxes on the market but I find the red and blue tool boxes from B&Q cheap and adaptable, it even has a seat!
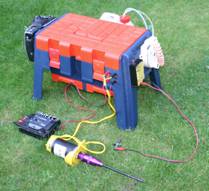
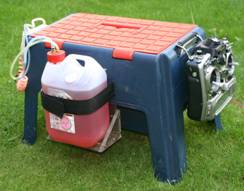
The three heaviest items in the box are the 12 Volt lead acid battery, the 12Volt starter motor and the fuel bottle. Customising your box to your specific needs is a great challenge, and if done right, will serve you well for many years to come, but as stated before, it must be luggable, so only carry the essential items to the field and leave the rest at home.
Top Tip1: The first bottle of fuel you purchase should be in a half gallon container, this is lighter to carry to the field than a full gallon and you can always top up the half gallon from the subsequent full gallon canisters you will purchase.
I have made a platform on my flight box for my 1/2 gallon fuel tank and used the strap from my mechanical fuel pump to support the fuel can. Talking of fuel pumps, I use a mechanical fuel pump that I have used for eight years without any problems. Other people down my flying site laughed at me as I manually cranked the handle to fill the tank to exactly full. Now most of them are on their third or fourth electric fuel pump, I do let them use my manual one when theirs fail!
Top Tip2: Simple is often best.
I have also made a 'U' shaped piece of plastic for holding the transmitter as well as fitting sockets to my box so that I can plug in my starter motor and a field charger at the same time, these are all wired back to the internal battery. All these things are cheap to do and make life a lot easier down the field.
Starter Motors
There are many starter motors in the market place and most are very reliable and will easily start a 30 size engine. The larger and more expensive starters are designed for the larger 90 size engines. Most starters come with a rubber cup at the end for starting planes but a starter wand with a hex ball head can be placed into this rubber cup that will start the helicopter engine.
Power Source
A 12Volt lead acid battery will be required with a minimum of 7Ah (7 Amps per hour) that will power the starter and power panel if fitted. Power panels can be purchased with connections for:-
- A glow plug at 1.5Volts adjustable on a rotary control.
- A connection for the starter motor.
- A connection for the electric fuel pump which has a forward and reverse switch for filling or emptying the helicopter tank if you choose to take the electric pump route.
Field Charger
A field charger, although not essential when you first start out, is handy to increase air time for both the transmitter and the receiver pack. When you start flying you will probably only fly twice before you go home tired!
Field Tools
There are many tools that are required at the field, but please remember, you have to carry all these to and from your car each time you go flying. An essential list goes something like this:-
- Glow plug Clip.
- 1.5, 2.0, 2.5 and 3.0mm ball ended Allen keys.
- Small flat blade screwdriver for adjusting the carb on the engine.
- Phillips screwdriver.
- A glow plug spanner.
- Small adjustable spanner.
- Thread lock.
- Spare fuel tube.
- Spare Glow Plugs.
- Retractable knife.
This list is short but essential, there are further nice to have tools such as ball link pliers etc, but these items can be added at a later date.
Workshop Essentials
Now let’s look at those bits that are left at home to build and strip the helicopter.
Now I know many people have their favourite tools that they have had man and boy, but we are talking about a precision and smooth running helicopter here, so examine these tools for wear, after all, you don't want to damage your new pride and joy before you have had a chance to fly it. I have already covered the ball ended Allen keys and small screwdrivers, the tools covered here are things like pitch gauges, engine locking tools and washing up liquid! Yup, you read that correctly (don’t tell the missus); I will be covering this essential item in my further articles.
The tools that are required to build a helicopter are outlined at the beginning of most assembly manuals and will be a great starting point. Now I mentioned an engine locking tool and I hear you shout, why do I need to lock the engine? Well, when bolting on the clutch to the engine you are required to tighten the engine nut fairly tight, but the engine will rotate if it is not locked into a firm position. There are many different ways to do this.
Top Tip3: The method that I would recommend is one that is not publicised that much, it’s an official engine locking tool from OS engines. This tool fits most makes of engines and is inserted from the back plate of the engine and grabs the con rod and the crankshaft itself. This tool is reversible, one side covering 30 size engines and the other side covering 46 to 60 size engines. This allows the engine nut to be tightened in a safe and non-damaging way.
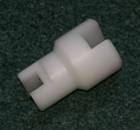
OS Piston Locking Tool.
DO NOT USE a piston locking tool that fits in the glow plug hole, all this will do is damage the head of the piston that is fairly thin, and distort the con rod. I doubt that an engine manufacturer will show any sympathy if you return a brand new engine with visible signs of this method! You have been warned.
Blade pitch gauges are a great asset to the beginner. This simple tool will help you to adjust the helicopter setting to achieve the correct conditions for that first flight especially if you can’t get an experienced flier to help you. Again, there are many on the market and all achieve the same result.
There is still a need for blade balancers for wooden ‘Kit blades’, but balancers are not required for most of the carbon fibre blades on the market today. Blade balancers will trim out both static (Still) and dynamic (rotating) imbalances on a set of rotor blades. Again this will be covered in a later issue. These balancers look like the scales of justice and are easy to use once the basics are understood.
Next is silicon sealant used for thinly spreading on the engine/exhaust joint. This will create a leak free and mess free joint, after all, the largest waste from the exhaust is the engines lubricant (oil) and this can leak out under pressure and cover your model (what was that about uses for washing up liquid, but don’t get caught washing down your model or your partner may show you other uses!). Silicon sealant is easy to remove and can withstand very high temperatures.
Threadlockers are essential when constructing, or repairing models. Loctite produce two types, green for high strength and pink for a lower strength. The high strength is used on the engine nut and on the tail rotor hub grub screws, and the lower strength is used on all other metal to metal fixings.
Cyanoacrylate (Cyano) can be used with metal to plastic fixings such as the metal screws into the plastic main frames. The cyano acts as a filler and when the screw is removed, it breaks up and does not cause problems, but in truth, I only use this method if the thread in the plastic is getting a little tired.
Top Tip4: Keep Cyano in the fridge, it lasts longer.
The subject of tools is vast as all tools are a must have (well that’s what I tell the wife!) but the main point of this article is to make you aware of the main tools required to build the model in the workshop (or the living room if you have an understanding partner!) and remember to only take the essential tools to the field
In the next article, we will look at what to do when you open the box of your new helicopter kit (I remember it well! Pure Joy!). Until then, have a browse at the tools listed on most helicopter websites, there are a lot and they are all tempting!